Don’t know how to run Tensorflow Object Detection? In this tutorial, I will show you 10 simple steps to run it on your own machine! We will use Tensorflow version 1.8. Are you ready to start detecting objects?
This guide will help you install Tensorflow on GPU enabled host. You will need Nvidia GPU with Compute Capability equal to 3.0 or greater. You can check CC here. If you don’t have such GPU you can omit CUDA and CUDNN installation and just install tensorflow without GPU support.
You can try to use these steps to install Tensorflow on Windows, but you will probably need some additional steps to accomplish it.
0. Operating system
I recommend Ubuntu 16.04 / 18.04. You can try Windows but Tensorflow doesn’t provide GPU enabled version for this OS. In Apple, there is no GPU anymore. In this tutorial, I will focus on Ubuntu and I will show you some tricks which will help to install.
1. Install CUDA Toolkit 9.0
Wow, why should I install 9.0 and not 9.1 or 9.2? Because Tensorflow 1.8 is built with 9.0, so you can just download the prebuild version. If you really need the bleeding edge not-stable version you can waste few days and compile it.
From the CUDA Toolkit Archive download version specific for your OS. In case of Ubuntu don’t use run-file installer – it destroys graphics driver and you will be stuck in the login loop. Use deb remote or local.
Download from here: https://developer.nvidia.com/cuda-90-download-archive
2. Install CUDNN 7.0.5 for CUDA 9.0
CUDNN provides functions specific to neural networks that are used by Tensorflow. It is extremely important to download the correct version for your CUDA and OS.
You will need to register. Registration is free.
https://developer.nvidia.com/rdp/cudnn-archive
3. Install python
If you are already using python just go to next step. There are many ways to install python. I will show you three of them, namely Anaconda, Virtualenv and native.
Anaconda and Virtualenv allow you to have multiple environments with different sets of libraries.
Anaconda
You can download it from here: https://www.anaconda.com/download/
Virtualenv
Here you will find instructions to download Virtualenv: https://virtualenv.pypa.io/en/stable/installation/
Native python
You will need to install python and package management system pip. Here is simple way to install python3 on Ubuntu.
sudo apt-get update
sudo apt-get install -y build-essential libssl-dev libffi-dev python3-dev python3 python3-pip
4. Install Tensorflow
When you prepared your python environment, you are ready to install Tensorflow:
Install Tensorflow with GPU support:
pip install tensorflow-gpu
Install Tensorflow without GPU support:
pip install tensorflow
5. Download Tensorflow repository
If you don’t have git installed, install git with following command:
sudo apt install -y git
Now we will clone Tensorflow and Tensorflow models repositories:
git clone https://github.com/tensorflow/tensorflow
cd tensorflow
git clone https://github.com/tensorflow/models
These repositories have tags matching versions of Tensorflow. You can checkout to a particular version, but from my experience you can leave it on branch master with latest commit.
6. Install Object Detection API
Now we will install the APU using this guide: https://github.com/tensorflow/models/blob/master/research/object_detection/g3doc/installation.md
So let’s install necessary libraries:
sudo apt-get install protobuf-compiler python-pil python-lxml python-tk
pip install --user Cython
pip install --user contextlib2
pip install --user jupyter
pip install --user matplotlib
7. Install COCO API
We will need to for model evaluation, but it is a good idea to install it just now. Change <path_to_tensorflow> to path to your Tensorflow repository.
git clone https://github.com/cocodataset/cocoapi.git
cd cocoapi/PythonAPI
make
cp -r pycocotools <path_to_tensorflow>/models/research/
8. Install Protoc
You can download it here: https://github.com/google/protobuf/releases
For 64-bit Ubuntu you will need: protoc-3.6.0-linux-x86_64.zip
After downloading run following command:
# From tensorflow/models/research/
protoc object_detection/protos/*.proto --python_out=.
Troubleshooting
- protoc not found
- Install protoc in /usr/bin/local
- Run protoc by providing the absolute path to protoc executable
- Protoc returns anything (shouldn’t print any message)
- Install the newest protoc
- Make sure that you haven’t installed protoc from Ubuntu repository using apt.
9. Install object detection
If you want to run object detection from any directory, I guess you want, you will need to add the path to your ~/.bashrc file. Obviously change <path_to_tensorflow> , replace ~ with $HOME.
export PYTHONPATH=$PYTHONPATH:<path_to_tensorflow>/models/research/:<path_to_tensorflow>/models/research/slim
10. Install Jupyter Notebook
This is a powerful tool! With the notebook, you can write your code interactively in your web browser. You will be able to run code cells step by step or all at once. Give it a try!
Here you will find installation instructions: http://jupyter.org/install
If you are new to jupyter notebook:
- Yes, you can download your code as
.pyfile - The notebook is good to create a rapid demo
- You can also run system commands using exclamation mark e.g.
!ls -la - Give it a try!
11. Run the demo now!
Now you are ready to run following demo in jupyter notebook object_detection_tutorial.ipynb.
cd tensorflow/models/research/object_detection
jupyter-notebook object_detection_tutorial.ipynb
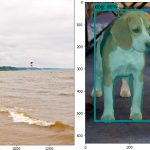
Now you can run each cell or all at once. The result will show up after the very last code cell. You will see detections on all of two images from test_images directory.
Tensorflow Object Detection API – SSD Mobilenet V2
Other models
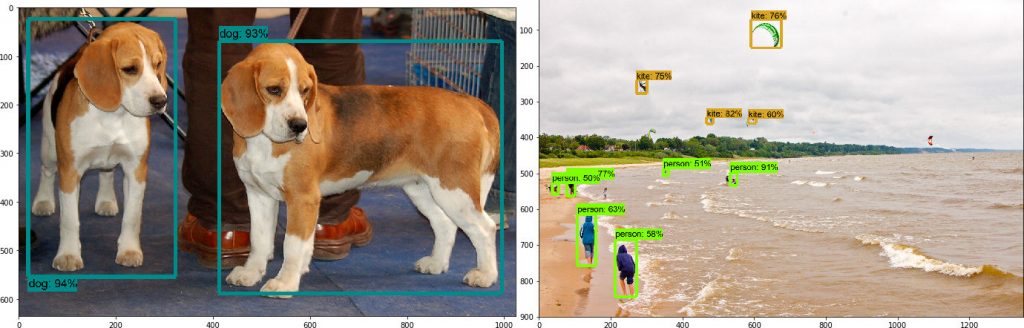
In this notebook, you can check different models by changing the MODEL_NAME.
MODEL_NAME = 'mask_rcnn_inception_v2_coco_2018_01_28'
Here you will find a list of available models: Model ZOO
If you want to use models trained on datasets other than MS COCO you will need to chage PATH_TO_LABELS respectively.
Using other models you can detect object masks!
Tensorflow Object Detection – Mask RCNN
What’s next?
Now you know how to run object detection for single images. You can try one of these ideas:
- Test nets on your images by copying them to
object_detection/test_images - Check other models with bounding boxes and masks!
- Run object detection for the video – like here
- Try to track objects in following frames
- Run it on your android phone – like here
Do you have any other ideas?
Any questions or problems?
Write your comment below!
I will try to write about all these ideas in future posts!
Conclusion
Now you know how to install Tensorflow in simple steps. You prepared your environment to run object detection, and you ran object detection using one or more models.
Did you like this post?
What can be improved?
Please provide your feedback!